Sunday, 2 October 2016

Learning to pickle with Sarsons and Kilner Jars


I love condiments and pickles accompanying my meals and they are even nicer when they are home made. Recently Sarsons UK's number one vinegar brand invited me to a pickling workshop in collaboration with Kilner Jars. I jumped at the chance as nothing beats having home made pickles and also with an abundance of fresh produce available what better way than to preserve it to use in the winter. With autumn on our door step  already, it won't be long before its Christmas and this year, I plan to make jars of pickles as edible gifts. That's half my Christmas presents sorted!!! If you want to have ago a pickling you can check out the recipes at the Sarsons recipe page.
FLL

Sarsons new speciality pickling vinegars are perfect as they do not require any extra addition of sugars or any other seasoning and they already have everything that's required in them.


To make your own pickles all that remains is to chop the vegetables, load them into jars and pour over the speciality blend vinegar's and hey presto you have home made pickles at a click of a fingers.I think the hardest part is waiting for the pickles to be ready for eating!!

.

At  the Sarsons pickling event we were able to taste 4 different types of pickles; pickled cucumbers, pickled garlic, pickled peppers and Vietnamese carrot pickle. My favourite amongst them all was the cucumber pickle, After the sampling we were able to make our own jars of pickles to take home.


Denise Tollyfield our chef  tutor for the night explained that for pickling its imperative to use the freshest ingredients to get the best results. For Optimum results don't be tempted to use old produce save that for chutneys instead!!! We had the freshest ingredients and lovely produce to create our pickles with.

We also learnt that it is equally important to wash and sterilise the jars and the rubber rings either by boiling them in a water bath or washing them in the dishwasher to. This ensures that the pickles stay fresh for longer.The Kilner jars are by far the best for this purpose and they come in various different sizes too.


We  had 4 stations each creating one of the above pickles. I chose to make the cucumber pickle with my friend Heidi whilst another friend Manjiri made the pepper pickle. I did not dare try the garlic pickle as those who were brave enough to taste it said it was rather pungent and would definitely ward off any vampires!!!

Our pickling session was really enjoyable and we all achieved some great results and I think each group was really successful in recreating the pickles we had sampled earlier.


I am really excited to see that my cucumber pickle not only looked great, it tasted delicious especially as I added some red chillies to it to give it a bit of a spicy Kick!!!!


Its always enjoyable to learn new culinary skills and its even more fun when you do it with your best buddies!!! Here is Heidi, Manjiri and my self "The Three Musketeers" proudly showing off our creations!!!


I was invited by Sarsons to the pickling workshop, all photos and opinions shared in this post are my own.

Sunday, 25 September 2016

Veggie Phyllo Baskets


The great British Bake Off week 5 was all about pastry. The signature challenge was to create breakfast pastries, the technical challenge was to create a bakewell tart and the show stopper was to create phyllo pastry appetisers. I think this was by far the most difficult week especially as pastry  is very hard to make right.

For this week I have totally gone out of my comfort zone and decided to create Veggie phyllo baskets. This is the first time I have attempted home made phyllo pastry and it was the most difficult thing I have ever tried. I can't say that my phyllo pastry was 100 percent successful but it did have a few layers and did not have a soggy bottom.The most difficult part was to stop it tearing when trying to stretch it thin and then cutting it to line the muffin cases was a nightmare. It just kept sticking together. Below I am sharing my creation.


print recipe

Veggie Phyllo Pastry Baskets
Crispy phyllo baskets filled with a spicy veggie filling.
Ingredients:
  • 120g Plain Flour
  • 1/4 teaspoon Salt
  • 1 tablespoon Olive oil
  • As required approx 60 ml Water
  • 2 Medium potatoes peeled and finely diced (5mm cubes)
  • 1 Medium carrot peeled and diced(5mm cubes)
  • 50g Frozen Peas (coarsely ground)
  • 3/4 teaspoon Salt
  • 1/2 teaspoon Chilli powder
  • 1/4 teaspoon Cinnamon powder
  • 1/4 teaspoon Ground cloves
  • 1/4 teaspoon Turmeric powder
  • 1 tablespoon Lemon Juice
  • 1/4 teaspoon Sugar
  • 1 tablespoon Olive oil
  • 2 tablespoons Olive oil for brushing on the pastry
  • 2 sprigs Fresh coriander finely chopped
  • 6 Lime wedges
Method:
1. Add the flour, salt and one tablespoonsof olive oil to a large bowl.2. Gradually add the water a little at a time to make a soft dough.Knead the dough for 5 minutes after which cover and rest it for 1 hour.3. In a frying pan add 1 tablespoon olive oil when it is hot add the diced potatoes, diced carrots and the coarsely ground peas.4. Add the salt, turmeric, chilli powder,sugar, lemon juice, ground cinnamon and clove powder and mix it all together. Cook the vegetable mixture on a low heat for 7-8 minutes until all the vegetables are cooked. Remove the filling from the heat and leave aside to cool.


4. Knead the phyllo dough for a good 10 minutes. Divide the phyllo dough into two as its easier to work with and roll it out on a floured surface as thin as you can. Once you have rolled it out, using your hands stretch the dough further until its like tracing paper.6. Oil a muffin pan with the oil and then cut squares from the rolled out phyllo pastry and line the muffin pan with them. brush each square with oil before layering on the next sheet. Layer 4 sheets in each muffin hole. Line all 24 muffin case hole in tray with the layers of phyllo pastry, gently pushing the sheets in so that there is a cavity for the filling to be filled in later.7. Preheat the oven to 180 degrees C / 35O degrees F. Bake the filo baskets in the oven until golden brown (approx 10-12 minutes)Remove the baskets from the oven and wait for them to cool.Fill each basket with the veggie filling.Garnish with chopped coriander and serve with lime wedges.
Details
Prep time: Cook time: Total time: Yield: 24 Baskets


Submitting this to :
Great Bloggers Bake Off with Jenny from Mummy Mishaps.


Thursday, 22 September 2016

Corelle Embossed™ Bella Faenza 16-pc Dinnerware Set ~I love it


I love beautiful dinner sets that match and have coordinating tableware, napkins, table cloths and place mats. One particular brand that I really love is my tried tested and fully trusted Corelle dinnerware set.  I have been using Corelle dinnerware in my kitchen for many years and I love all the beautiful designs they come up with. Some bold and bright and then the dainty floral prints.


Over the years I have had various different colours and patterns and also round and square plates too. This year I have added to my collection the Corelle Embossed™ Bella Faenza 16-pc Dinnerware Set which is simple but really elegant. It’s perfect for daily use or even to use for entertaining. It features a classic design of scrolls and leaves on a beautiful white background. 


The patterns are etched which means that they will not wash, wear or scratch off. They are made from Vitrelle® glass and have a three year warranty on them. The glass is light weight, chip and break resistant and you can use it in the microwave or oven and it is dishwasher safe too. The dinner sets come with 4 dinner plates, 4 side plates, 4 bowls and 4 stoneware mugs.I particularly like the fact that the plates and bowls are a generous size but not overly big, they are perfect for daily use. The 16 piece set is available from World Kitchens and it retails at £79.99. You can also buy all the components individually so if you do happen to damage or break one of the set it can easily be replaced without having to purchase the complete set.


This set was a press sample supplied by World Kitchens. All the views and opinions expressed are of my own in this post.

Sunday, 18 September 2016

Pav Bhaji- Indian Street Food


Pav Bhaji  is a delicious hot and spicy Indian street food, served piping hot by vendors in many Indian streets. It is a blend of vegetables cooked on a open griddle with  fragrant  and aromatics spices called bhaji .The spicy bhaji is served hot topped on top of a soft pav which are soft bread roll cut in half and buttered and then toasted. The pav bhaji is garnished with chutneys and onions and served a with a squeeze of lime juice and a chilli pepper if you dare. It is a perfect meal in one, Indian street food at its best.

I first tasted this delicious street food snack when I visited India some 10 years ago. Much to my hosts amusement, I had tears rolling down from my eyes from the spiciness of the bhaji but despite that I can still remember the amazing taste. I have recreated this awesome Indian street food although I have toned down the spice levels considerably.


print recipe

Pav Bhaji ~Indian Street Food
It is a blend of vegetables cooked on a open griddle with fragrant and aromatics spices. The spicy bhaji is served hot topped on soft pav which are soft bread rolls cut in half and buttered and then toasted toasted .
Ingredients:
  • 160g Potatoes finely diced
  • 160g Frozen Peas coarsely ground in mixer
  • 160g Carrots finely diced
  • 160g Cauliflower grated
  • 160g Aubergine peeled and grated
  • 1/2 teaspoon Garlic paste
  • 1/2 teaspoon Ginger paste
  • 1/2 teaspoon Green chillies finely chopped
  • 100 ml Tomato passata
  • 1/2 teaspoon Chilli powder
  • 1.5 teaspoons Pav Bhaji Masala
  • 2 tablespoons Lemon Juice
  • 1 teaspoon Salt
  • 1 small Red Onion thinly sliced for garnish
  • 1 tablespoon Olive oil
  • 12 Soft white Bread rolls
  • 1 tablespoon Sunflower spread
  • 1 Lime cut into wedges
  • 1 Red chilli thinly sliced
  • 3 sprigs Fresh coriander finely chopped
  • 2 tablespoons Green coriander chutney
  • 2 tablespoons Date and tamarind chutney
Method:

1. In a large steamer bowl add the diced potatoes, carrots, cauliflower, aubergines and coarsely ground peas. Steam all the vegetables for 20 minutes until well cooked.2. Mash all the steamed vegetables using a potato masher.3. In a pan add the olive oil and heat it, add to the the garlic and saute for a few seconds, next add the ginger and finely chopped chillies and the passata.3. Add the salt chilli powder, pav bhaji masala and cook the tomato mixture until all the spices infuse into the tomatoes.4. Add the mashed vegetables together with 60 ml of water and mix all the tomato spice mixture thoroughly into the vegetables. Cook the vegetables on a low heat mixing intermittently for about 10 minutes until the spices are well infused into the vegetables and they have broken down fully.The mixture should not be totally dry.5. Take the mixture ff the heat and garnish with the chopped coriander.6. To serve the pav bhaji cut the bread rolls in half and butter them with the sunflower spread. Heat a griddle pan and when it is hot add the bread rolls buttered side down so that the bread starts to toast and you get a lovely caremelised buttery flavour to the rolls.7. Remove the bread rolls from the griddle and place them on a serving plate. Top the Pav (toasted bread rolls) with the bhaji(the vegetable mixture) and garnish with the thin onion slices, chutneys, and red chillies.
Details
Prep time: Cook time: Total time: Yield: Serves 6

Tips: You can make the chutneys from my recipe posts below:
Tamarind Chutney
Green Coriander Chutney. These chutneys are also available ready bottled in most Asian supermarkets and also world food section in all large super markets.

The Pav Bhaji Masala is available in most Asian Super Markets and it is an essential part of the recipe to give it the authentic street food taste.


Friday, 16 September 2016

Churros


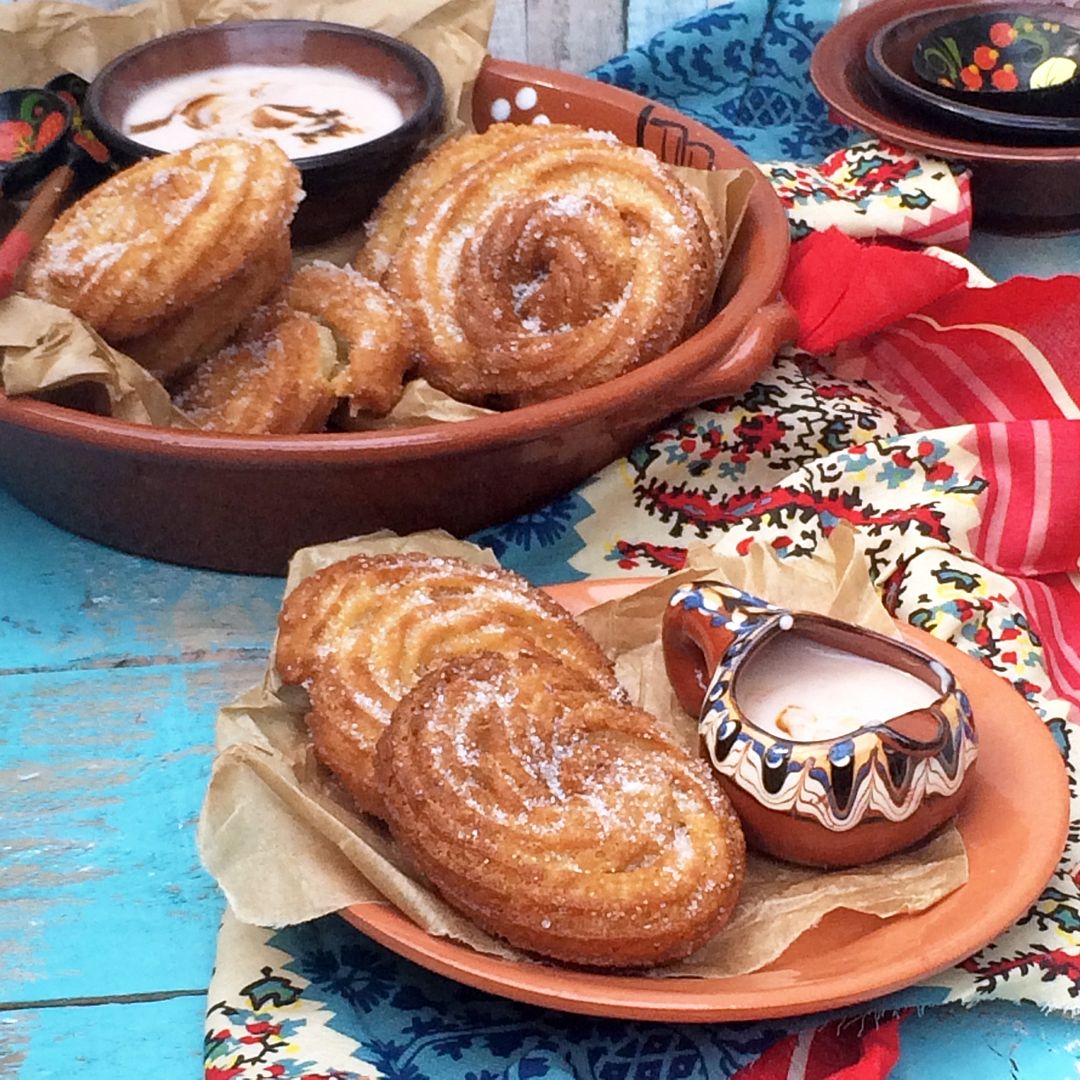
Week 4 of the Great British Bake Off and the theme is batter, this is a first on the series where contestants have been challenged to create recipes using batter. This weeks the signature challenge was yorkshire pudding with filling, technical challenge was lace pancakes and showstopper was churros a Mexican fried doughnut. It was a really interesting challenge and it was great to see all the different combinations of flavours that the participants offered.

At simplyfood I rarely fry food and you will find very few recipes that are fried, I am fairly health conscience how ever fried food eaten in moderation is fine so this week I have decided to make churros. The recipe I have used is from Rachel's yoghurts, only modifcations I made were that I left out the eggs in the recipe as I have seen on google that you can make churros with out eggs too.I also chose to go for a non conventional shape and make my churros in spirals like pinwheels.


print recipe

Churros
A delicious fried sweet doughnut that is flavoured with cinnamon sugar and served with a dipping sauce.

Ingredients
  • 25g Butter
  • 200 ml Water
  • 175g Self raising flour
  • 1/2 teaspoon Baking powder
  • 1 tablespoon Rachel's honey Yoghurt
  • 800 ml Oil (for deep frying)
  • 1/2 teaspoon Cinnamon for dusting
  • 100g Sugar for dusting
  • 200ml Rachel's honey Yoghurt for dipping with a extra pinch of cinnamon for sprinkling.

Method:

1. In a pan add the water and butter and bring the mixture to a boil. Remove the pan from the heat and keep aside 2.Sift together the flour and baking powder and add this to the water and butter mixture and quickly mix the ingredients until they come together.Leave the mixture to cool slightly.3. Once the dough has cooled slightly add in 1 tablespoon of Rachel's honey yoghurt and mix it in thoroughly. 4. Cover the dough and leave the dough to rest for 30 minutes.5.Place a large star nozzle into a large piping bag and fill it with the dough.6.On grease proof paper pipe 12 spiral pinwheel shapes making sure you leave space between them. Leave these a side to rest for 10 minutes.7.In a plate mix together the sugar and cinnamon and keep aside.8. Heat oil in a deep fryer to 190 degrees C. Once oil is hot test it by dropping a ball of dough if it immediately floats to the surface oil is ready.9. Gently lift off the piped churros off the grease proof paper and lower them into the hot oil. (Only fry 2-3 at a time , do not over crowd the pan)Deep fry them for 2-3 minutes until golden brown. Remove them from oil with a slotted spoon and transfer them to a plate with a piece of kitchen paper on it.Fry the remaining churros in small batches.10.Once all the churros have been fried sprinkle them with the cinnamon sugar.11. For the Dip pour some Rachel's honey yoghurt into a dish and sprinkle with a pinch of cinnamon.Serve the dip with the churros.
Details
Prep time: Cook time: Total time: Yield: 12


Churros are generally served with a dipping sauce, chocolate sauce is a firm favourite however I am serving my churros with Rachel's Honey yoghurt with a sprinkling of cinnamon on the top.


I took inspiration to create this recipe from GBBO, it is created in collaboration with Rachel's Yoghurts. The recipe used in this post has been adapted from Rachel's Yoghurts.


Submitting this to :
Great Bloggers Bake Off  with Jenny from Mummy Mishaps.


Related Posts with Thumbnails