Strawberries are in abundance this time of the year. Nothing beats a big bowl of strawberries smothered with lashings of cream.There are so many recipes that are my favorite that I look forward to making when strawberries are in season such as strawberry tart, strawberry mousse, strawberry ice cream and strawberry lemonade.Below I am sharing my favorite strawberry lemonade recipe.
print recipe
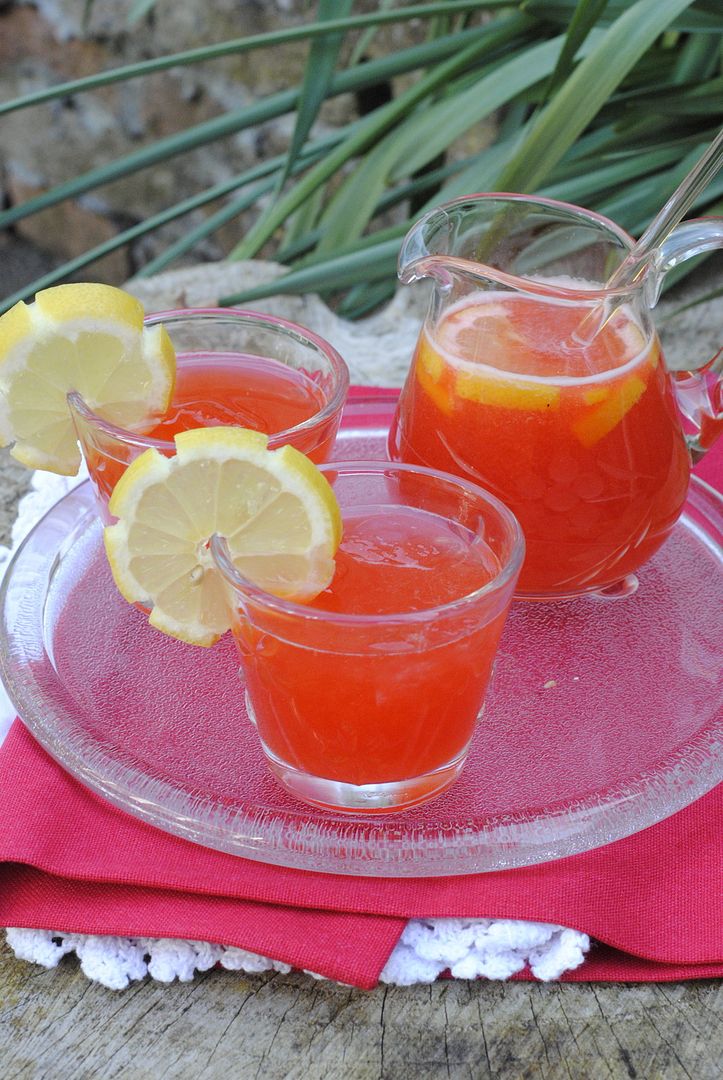
Strawberry Lemonade
by Nayna Kanabar May-21-2015
Refreshing and delicious summer strawberries with a lovely citrus tang from lemons makes this lemonade simply delicious .
Ingredients:
12 Strawberries
2 Lemons
100 ml sparkling water
1 tablespoon stevia sugar
1 cup icecubes
Method:
1. Wash the strawberries and hull them.2. Cut the top and bottom of one lemon and cut it into slices. 3. Peel the second lemon and remove the skin and pith.4.Add all the strawberries and whole peeled lemon into the Optimum 600 and extract the juice, once all the fruit has been juiced add some stevia sugar to sweeten it. 5. Strain the juice into a jug and add the sparkling water, ice cubes and some lemon slices.6. Stir and serve in glasses garnished with lemon slices.
The Optimum 600 juicer is slow juicer that extracts juice keeping all the nutrients in it.To find out more about it and make a purchase You can check it out here. Currently its on a special discounted price of only £249
This is my assignment with the Secret Recipe Club.The aim of the club is that you are allocated a blog from which you have to select a recipe and try it and blog about it. For the month of May my assigned blog was The pajama chef written by Sarah who is a librarian and has a passion for baking. She claims that she would happily wear pajamas 24/7 I guess that's got something to do why the blog is called The Pajama Chef. I was browsing through the recipes and immediately fell in love with the Chocolate Chip Orange cookies. The only changes I made were that I used white chocolate chips instead of brown as I accidently picked up the wrong ones whilst shopping. The cookies turned out delicious and I am going to make them again very soon.My work colleagues said three dozen were not enough when I took them to work!!!!
print recipe
White Chocolate Chip and Orange Cookies
by Nayna Kanabar May-18-2015
Fragrant orange scented white chocolate chip cookies that melt in the mouth.
Ingredients:
1/2 cup White Sugar
1 cup Butter
1 cup Brown Sugar
2 Eggs
2 teaspoons Vanilla essence
2 teaspoons Orange Juice
1 tablespoon Orange zest
3 1/4 cup Plain Flour
2 teaspoons Baking Soda
2 cups White chocolate chips
Method:
1. Preheat the oven to 175 degrees C /350 degrees F and line 6 cookie sheets with parchment paper.2. Cream together the butter and sugar, add the eggs one at a time, followed by the vanilla essence, orange juice, orange zest, baking soda and flour and chocolate chips. Mix together to form a dough.Cover and chill for half an hour.3. Scoop small walnut sized balls from the dough and place them on the baking trays making sure they are spread apart as they will spread when baking. Slightly flatten each ball with your fingers.4. Bake the cookies in a preheated oven for 12-15 minutes until golden brown, remove them from oven and transfer them to a wire rack to cool.
1. Cut open the plums and remove the stones.2. Wash the carrot and apple.(no need to cut or peel) 3. Feed the plums, apple, ginger and carrot into Optimum 600 juicer.4. Pour the juice into on the go bottles or into serving glasses.5. You can add a dash of honey is desired.(I didn't)
The Optimum 600 juicer is slow juicer that extracts juice keeping all the nutrients in it.To find out more about it and make a purchase You can check it out here.
Protein packed mixed dhal with antioxidants from the kale make this dhal super healthy and delicious.
Ingredients:
1 cup Chickpea Dhal
1/4 up Moong Dhal without husk
1/4 cup Split pidgeon peas Dhal
1 teaspoon Ginger paste
1 teaspoon Garlic paste
1 teaspoon Fresh green chilli paste
1/2 teaspoon Ground turmeric
1/2 teaspoon Chilli powder
1 teaspoon Salt
1 tablespoon Lemon juice
1 tablespoon Olive oil
1 tablespoon Fresh coriander leaves
large handful Kale
1/2 teaspoon Mustard Seeds
600ml Water
1 Medium tomato
5-6 slices Toasted Coconut
Method:
1. Wash the dhals and soak them for 4 hours in warm water.2. Boil the dhal in 400ml water for 30 minutes until its cooked but still holding shape.3. Wash the kale and chop it finely. Wash the tomato and chop it finely.4.In a pan add the oil, when it is hot add the mustard seeds and wait for them to crackle. add the garlic paste , ginger paste, chilli paste and sauté for 30 seconds.5. Add the kale and tomatoes and 100 ml water and cook the kale for 5 minutes.6. Add the cooked dhal, salt, turmeric, chilli powder, lemon juice to the kale and add 100ml water, simmer the dhal for 10 minutes until all spices , kale and dhal have all infused together well. Add more water to reach desired consistency.7.Take the dhal off the heat and transfer to a serving bowl , garnish with fresh coriander and coconut. Serve with boiled rice.
Details
Prep time: Cook time: Total time: Yield: 4 servings
Being a vegetarian, incorporating fresh fruit and vegetables in my family's diet is of paramount importance to me. I prefer to use fresh herbs, fresh fruits and vegetables in all my recipes when ever possible. On occasions, I find that some ingredients are seasonal or I only want a little quantity of it in my recipe and it
can be expensive buying a different set of ingredients for every meal. To make sure that I always have the freshest ingredients in my recipes and to avoid waste, I have started to freeze my herbs, vegetables and fruits so that they are readily available in my kitchen all the year around.
Most foods can be frozen, the benefits of freezing food is that you can retain their nutritional value, colour and flavour. Freezing vegetables that are in season is also a good way to budget, you can often buy them in bulk at a nominal cost from markets especially if you shop at the end of closing time and the produce is reduced for quick sale.
Vegetables frozen straight after picking will have all their nutrients locked in immediately so that you benefit from them more compared to other forms of food preservation.
I am very keen on freezing in my kitchen so when I read about the Dr.Oetker Ristorante "Freshness Frozen" campaign I was totally mesmerized.
The picture above is a pizzeria made from four tonnes of ice opened, for one day only, outside London Liverpool Street railway station, to promote the nation’s favorite thin and crispy frozen pizza brand. It was crafted from 34 huge blocks of ice and using 3,400 litres of water.Can you just imagine what a spectacular sight this must have been?
This magic was created by Ice experts from Glacial Art Ice Sculptors, who spent a month making the ice cubes and then spent all night setting up the pizzeria in time for surprising the morning commuters. Each block of ice contained the essential ingredients of classic pizzas suspended within its frozen walls, which passers-by could watch in awe . The designs in the ice were made using real peppers, chilli, salami, ham, pepperoni and various herbs, which were all placed individually in the water by hand and held in place until the ice began to freeze. Sadly I missed seeing this amazing creation but below you can see a video of exactly how it was put together and how it looked when completed.
Coming back to my freezer tips, some of the foods you will regularly find in my freezer are frozen peas, frozen sweetcorn, frozen mixed vegetables, herbs such as fenugreek, curry leaves, spinach, garlic, ginger, coriander, green and red chillies and lemon grass.
I also freeze homemade soups, vegetable stocks, chutneys and many emergency meals such as pasta bakes, stews and pre boiled pulses which makes preparing dinner after a long day at work easy and simple .
Freezing herbs such as garlic, ginger and chillies is very simple. I grind and pour the contents into ice cube trays to set. Once the ice cubes have set I transfer the contents into labeled and dated freezer containers for easy storage.
The easiest way to prepare vegetables and fruits for freezing is to wash it and towel dry it, cut it into bite size pieces or leave whole in the case of berries or small vegetables like peas and corn. Once the vegetables have been prepared place them into freezer bags or clear tubs, date and label them clearly with the contents.
Frozen fresh fruits are perfect for making icecreams and smoothies.I freeze over ripe bananas, mixed berries, mangoes and freshly grated coconut.In the summer when tomatoes are available in abundance, I wash the overripe tomatoes and puree them for freezing which are perfect for making soup, pasta sauces or adding to stews and curries.
The freezer is also handy for those moments when my family want a quick sweet treat or I have a surprise visitor for coffee, I always have some frozen cookie dough that can be made into delicious cookies in a short space of time, providing the perfect indulgent treat.
For cooked foods, I cool the food quickly then freeze them in single serving-sized portions. Your freezer should operate at a temperature
of -18ºC and you must take care that it is not over filled. Most products should be consumed within three months of freezing which is why dating them is important. You must also take care not to re freeze already frozen products that are thawed and any cooked food consumed from the the freezer must be reheated properly before eating. If you keep all these tips in mind your freezer will be your best friend in the kitchen.
This post is in collaboration with by
Dr Oetker Ristorante as part of their #FreshnessFrozen campaign. All views and opinions are my own .
Pistachio and rose a match made in heaven. These delicious biscuits are not only pretty to look at they are totally sugar free. The sugar added to them is the Natvia sugar which is plant based and made from the stevia plant. Its 100 % natural with no artificial colours or flavorings, its low in carbs, tooth friendly and fructose free too with no bitter after taste.
print recipe
Pistachio and Rose Biscuits
by Nayna Kanabar May-3-2015
Delicious pistachio biscuits with a lovely rose scented icing.
Ingredients:
480g / 16oz Plain flour
240g / 8oz Salted butter at room temperature
240g / 8oz Natvia natural sugar
90g / 3oz Pistachio
1 level teaspoon Bicarbonate of soda
60 ml Milk
For the icing:
2-3 drops Pink food colouring
90g /3 oz Natvia Icing sugar
1 teaspoon Rose Essence
1 -2 teaspoons water( as required)
Method:
1. Preheat the oven to 200 degrees C / 350 degrees F2.In the mixing bowl add the softened butter and natvia sugar and cream it together. Add the flour, bicarbonate of soda and the milk little at a time and form a dough. Cover and leave the dough to rest for 30 minutes.3.Thinly slice the pistachios and reserve a third for garnish.4. Add the remaining 2/3 of pistachio slices to the dough and knead them in.5. Dust some flour on the surface and roll out the biscuits to 5mm thickness. Cut out the biscuits to the desired shape and transfer them to baking trays.Repeat for all the dough.6.Bake the biscuits in the preheated oven for 10 -15 minutes until golden brown. Remove from the oven and transfer them to a wire rack to cool.7. In a bowl add the Natvia icing sugar, add the pink food colouring and the rose essence and a few drops of water to make a thick icing.8. Lay the biscuits on tray and drizzle some pink rose icing onto each biscuit, alternatively fill a piping bag with the rose icing and drizzle some lines of icing on the biscuits. In the center garnish with a few pistachio slices.9.Leave the icing to set before eating.
Details
Prep time: Cook time: Total time: Yield: 48 biscuits
I was sent samples on the Natvia sugars to try , all the views and opinions in this post are my own. I found that the baking sugar was really good and worked well in the recipe, however the icing sugar formed a very grainy icing and it was difficult to pipe with it so I don't think it would be suitable for a big icing project although it was ok for small cookies and icing cupcakes. We also tried the sugar in tea, coffee and cereal, the sugars tasted fine and we did not get any after tastes so they are a perfect substitution for recipes that require sugar.We will definitely make the change to this healthy sugar.
I also made a peach Frappe and used natvia sugar to sweeten it you can see the recipe here.
In all Gujarati households there is always some form of condiment or salad that accompanies the main meal. Kachumber is a simple salad made with shredded cabbage, tomatoes, coriander and green chillies tossed in lemon juice, salt and a pinch of chilli powder.
print recipe
Kachumber Salad
by Nayna Kanabar May-1-2015
A simple tangy and spicy cabbage and tomato salad.
Ingredients:
120g / 4oz Green Cabbage
10 Cherry Tomatoes
1 Green Chilli
1 tablespoon Lemon Juice
1 sprig Fresh Coriander
1/4 teaspoon Chilli powder
1/4 teaspoon Salt
Method:
1. Wash the cabbage and shred it very finely. Put the cabbage in a bowl.2.Wash the cherry tomatoes and half them and add them to the bowl.3. Slice the chilli, remove the seeds and membrane and cut it into small pieces and add it to the bowl.4. Finely chop the coriander and add it to the bowl.5. Add the lemon juice, salt and chilli powder and toss the salad together.6. Transfer the salad to a serving bowl.
For the month of May , I am going to run the event using the humble veg peas. Inviting all foodies to create vegetarian (eggs allowed) recipes with peas and link them here.
To Participate:
1.Prepare a dish vegetarian dish (eggs allowed) please link your dish using the linky below by entering your Dish Name and Post URL
2.Please link this event announcement with your entry, this is mandatory.
3.Use of logo is not mandatory but it helps to spread the word if you can post it..
4. Multiple entries are allowed, archived are only allowed if reposted and updated with this event link.
4. In the event of problem using linky you can email me the entry at simplysensationalfood@gmail.com
Please use this format
Your Name:
Recipe Name
Recipe URL
Image no larger than 300 pixel