Monday 27 October 2014

Bread and Butter Pudding


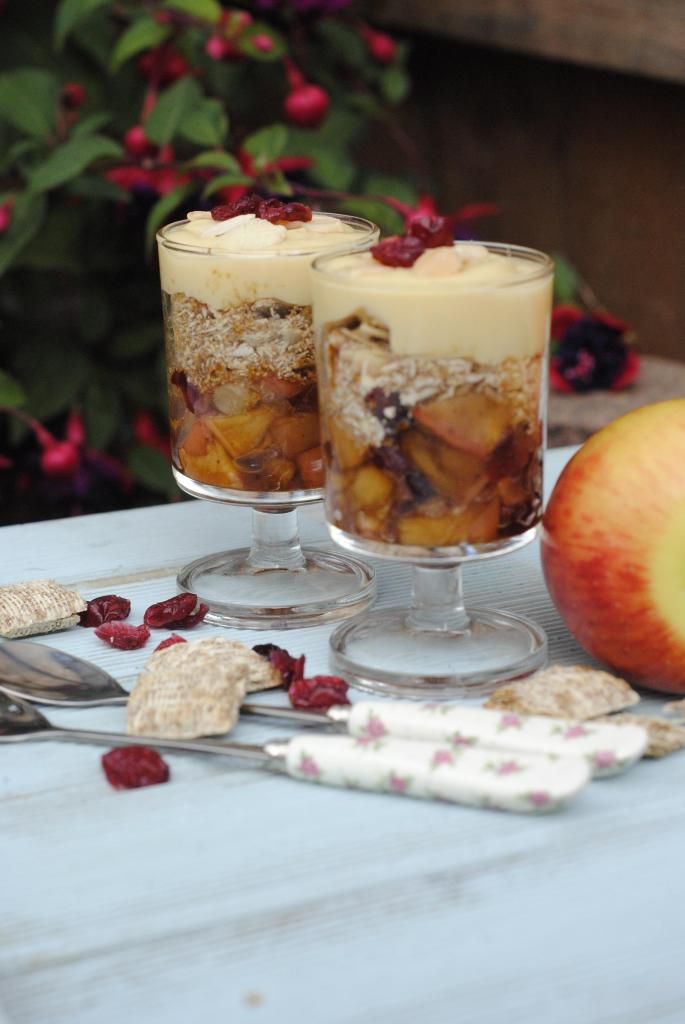
I prefer warm desserts in the Autumn and winter and one of my family favorite desserts is bread and butter pudding. It warming, hearty and simply delicious mid week dessert that can be made in a jiffy and does not really need much preparation. It's one of those desserts that you simply layer everything in a baking dish , pour over a liquid mixture and pop it in the oven and forget about it for 30 minutes, which gives you ample time to prepare your main course. 
I got this Bread and Butter pudding recipe from Sunrise Senior Living care homes  who offer a wide choice of delicious and healthy meals, all devised by award winning chefs.The only changes I made to the original recipe is that I used brown bread instead of white and served the custard separately so that each person could choose to add it to their dessert to their requirement.


print recipe

Bread and Butter Pudding
Delectable Bread and Butter Pudding.

Ingredients:
  • 6 slices Brown Bread
  • 30g Salted Butter
  • 15g Currants
  • 60ml Semi skimmed milk
  • 20ml Double cream
  • 20ml Caster Sugar
  • 1 teaspoon Lemon zest
  • 1/4 teaspoon Nutmeg
  • 2  medium Eggs
  • 20g Brown Sugar
  • 150 ml Custard
Method:

1. Preheat the oven to 180C /350F , grease an ovenproof dish and keep aside.2. In a bowl whisk together the eggs and 20g caster sugar, add to it the nutmeg, milk, eggs, lemon zest and 20 ml double cream and whisk together.3.Remove the crusts from the bread and butter all the slices and cut them into triangles.4. Place a layer of bread slices in the prepared baking dish and sprinkle some currants, repeat step 4 until all the bread is used up, finish with a layer of bread. 5.Pour the egg mixture over the bread slices and sprinkle the top with the brown sugar.6. Bake the bread and butter pudding in the preheated oven to bake for 30 minutes until golden brown, 7. Remove from oven and serve warm with custard.
Details
Prep time: Cook time: Total time: Yield: Serves 4

Sunday 26 October 2014

Garam Masala and Coffee Grinder from Qwerkity


I use a lot of spice mixtures such as garam masala, biryani masala and tandoori masala in my cooking. But I hate using prepackaged shop bought spices as they don't have the same aroma that freshly ground spice mixtures do. There is nothing better than the fragrance that is released from freshly roasted  ground spices.

To make your own spice mixture, it is better to make it in small quantities as over time the spice will loose it aroma.Always store spices in an air tight sterilised glass jar. To grind your own spice a good quality coffee grinder is essential. It should have a strong blade and a pulse operation. Spices such as cinnamon should be broken into small pieces.
Before grinding spices, dry roast the individual spices in a pan on a low heat, constantly tossing the mixture so that the spices start to release the aroma.Once spices are roasted, allow them to cool to room temperature and then grind them to a powder in the coffee grinder using the pulse button, this ensures that the motor does not burn out and you can control the texture of the spice mixture whether you want it fine or coarse.


I love the Lloytron coffee grinder from Qwerkity, it is a stylish coffee grinder for the kitchen with a powerful and quiet motor. It has stainless steel blades with a pulse operation which is perfect for grinding spices and coffee.The grinder comes with a  a transparent easy-view lid and  it has an integral cord tidyfor easy storage. The Llottron coffee grinder is the perfect gadget for any foodie. It retails at £ 24.99 and is available from Qwerkity.


print recipe

Garam Masala
Aromatic homemade garam masala with flavours of the East

Ingredients:
  • 1 tablespoon Cardamom seeds
  • 1 tablespoon Cloves
  • 4 large Cinnamon Sticks broken into small pieces
  • 1 tablespoon Black Peppercorns
  • 4 Star Anise
Method:

1. In a heavy bottom pan dry roast the spices on a low heat for 10-12 minutes until thy start to release a spice aroma. 2. Remove the spices from the heat and transfer them to a plate and allow them to cool to room temperature.3.Once spices are cooled transfer them to the coffee grinder and grind them to a fine powder.4. Transfer the garam masala to a sterilised glass jar with an air tight lid and store in a cool dry place.Use the spice mixture to flavour, curries, rice or soup.
Details
Prep time: Cook time: Total time: Yield: 1 small jar

I was sent the coffee grinder by Qwerkity to review, all the opinions and thoughts shared in this post are my own and unbiased.

Thursday 23 October 2014

Coconut Delight Roses-Diwali Special


Today is the Hindu Festival of Diwali, to celebrate I have created this delicious yet simple sweet that is perfect for gifting and serving . I would also like to wish all my readers and visitors avery happy Diwali. Thankyou all for your visits, comments and love that you share with simplyfood, all of which inspire and motivate me.


print recipe

Coconut Delight Roses


Tutti frutti and Coconut layered on delicious white chocolate.

Ingredients:
  • 200ml Sweetened Condensed Milk
  • 200g Dessicated Coconut Flour
  • 40g Mixed Tutti Frutti -dried papaya,mango and pineapple
  • 2 drops Orange food colour
  • 1/2 teaspoon Orange Essence
  • 300g White Chocolate
Method:

1. In a bowl add the coconut flour, finely chopped tutti frutti (dried mango, papaya and pineapple) and condensed milk, orange essence and make a dough . Add the condensed milk a little at a time until mixture comes together to form a ball.2. Divide the mixture into two parts and add orange colouring to one part. Make 12 small balls from each of the mixtures, the white and the orange and push the balls into a rose silicon mould. Pack the mixture tightly into the moulds leaving a 5mm gap on top for the chocolate layer. You will have 12 orange coloured delights and 12 white delights.(Alternatively you can make the whole lot orange by adding the colour to all the mixture)3. Melt the white chocolate in a heat proof bowl in the microwave for 1 minute and then at 10 second intervals until chocolate is totally melted. Stir the chocolate to ensure its smooth.4. Pour a layer of chocolate on top of the coconut layer and tap the mould to evenly distribute the chocolate.5. Place the silicon mould rose tray in the fridge to chill for 30 minutes.6. After 30 minutes push out the chocolate roses from the mould and serve.
Details
Prep time: Cook time: Total time: Yield: 24
NB -You can add the mixture to a square tray and pack it down after which pour the chocolate over it and leave to set. Once set cut into squares.

Monday 20 October 2014

Citrus Orange and Cucumber salad ~ Secret recipe club challenge 20th October 2014


This is my assignment with the Secret Recipe Club.The aim of the club is that you are allocated a blog from which you have to select a recipe and try it and blog about it.

This month I was assigned the kitchen witch blog that is written by Rhonda who is a professional food photographer. Whilst I was searching her blog for a vegetarian recipe, I got thoroughly carried away as I spent such a long time drooling over her amazing food photos. I fell in love with all her background boards too. At the moment I have been trying to loose a few pounds so creating a salad for my lunch box everyday has been somewhat challenging. When I saw Rhondas citrus and cucumber salad I immediately fell in love with it. I loved the colour of the orange and the pretty cucumber rings and the overall presentation and the background board what can I say I want one like that too!!! 

The salad is simple but the flavours are amazing, light and tangy. It is delicious and I have since made it 4 times, its one for keeps for sure.You can see Rhondas Uniq citrus and cucumber salad here. The only addition I made was that I scattered a few pomegranate seeds on the salad to give it a little more colour and texture.

print recipe

Citruss Orange and Cucumber Salad

Tangy orange with refreshing cucumber and jewelled pomegranate salad in a delicious lemon dressing with chilli flakes and coriander.

Ingredients:
  • 2 Jaffa Oranges
  • 1/2 Cucumber
  • 2 Spring onions
  • 1 tablespoon Fresh coriander finely chopped
  • 1 teaspoon Lime zest
  • 2 tablespoons Lime juice
  • 1 tablespoon Olive oil
  • 1/2 teaspoon Chilli flakes
  • 1/4 teaspoon Coarsely ground black pepper
  • 1/4 teaspoon Salt
  • 2 tablespoons Pomegranate seeds
Method:

1. In a jar with a lid add the lime juice, lime zest, olive oil, salt, chilli flakes and black pepper. Screw the lid on and shake the jar to combine everything.
2. Peel the orange and remove all the skin and pith and slice into rings and then cut the rings into halves. Place the orange slices onto a serving dish.
3. Slice the cucumber thinly into rings and arrange over the orange slices.
4. Slice the spring onions both the green and white parts thinly and scatter over the salad.
5. Scatter the chopped coriander and pomegranate seeds over the salad. 
6.Drizzle the lime dressing over the salad.

Details
Prep time: Cook time: None  Total time:


Monday 13 October 2014

Kiksekage~ Chocolate biscuit cake Secret Recipe Club Challenge 13th October 2014


This is my assignment with the Secret Recipe Club.The aim of the club is that you are allocated a blog from which you have to select a recipe and try it and blog about it. 
I have been part of SRC for almost three years now and I really enjoying looking through my secret blog assignment  and choosing a recipe to cook from. This month I am going to do the challenge twice as I am doing an extra one for group B to help out. The blog I am cooking from today is called Sid's Sea Palm Cooking. Looking through Sid's blog I noticed she is a member of the boat club and shares her creations with her friends. How lovely is that.  

Being a vegetarian I always head over to the vegetarian friendly recipes and in Sids blog I found she had 34 recipes that were vegetarian. However my sweet tooth took the better of me and  fell in love with the Aebleskivers -danish pancake balls and the  Kiksekage Chocolate Biscuit cake . I tried both but the photos of the chocolate cake won the toss so I am sharing it here:

The cake was easy to make and really tasted delicious. The only changes I made were that I left out the alcohol since I don't drink.

print recipe

Kiksekage-Chocolate Biscuit Cake


Layers of biscuit drenched in a silky smooth chocolate ganache.

Ingredients:
  • 1 packet -360g Rectangular biscuit (lotus biscoff)
  • 240 ml Double cream
  • 240 g Milk Chocolate
  • 120g Icing Sugar
  • 120g Butter
Method:

1. Break the chocolate into pieces and add it to a glass bowl.2. In a pan warm the cream with the icing sugar, keep stirring the cream until icing sugar melts.3. Remove the cream from the heat and slowly pour it onto the chocolate and keep whisking until the chocolate melts.4. Add the butter to the chocolate ganache and whisk until it has melted and the ganache has a nice shine.5.Place the chocolate ganache into the fridge for 30 minutes.6.Line a loaf tin with some cling film. Pour a this layer of the chocolate ganache into the bottom of the tin and tap the tin to spread it out.7. Place a layer of biscuits side by side on top of the chocolate ganache.Spread a layer of ganache on top of the biscuits.8. Repeat the layers in this way until all the biscuits are used up and you finish with a biscuit layer.9. Place the biscuit cake in the fridge to chill overnight.10. To serve, lift the biscuit cake out of the loaf tin with the help of the cling film.Place a long tray over the cake and invert it.11. Remove the cling film and slice the cake as required. Cake needs to be kept refrigerated and only remove before serving.
Details
Prep time: Cook time:0 Total time: Yield: Serves 12
Overnight Chilling required.

I used Caramelised Lotus Biscoff biscuits , but you can use rich tea or morning coffee or malted milk biscuits in the recipe.


An InLinkz Link-up


Submitting to:

 Lets cook for Halloween event by simplyfood

Thursday 9 October 2014

Apple and Cranberry Crumble in the ActiFry

Eating healthy and maintaining a healthy diet is very important in our lives, that does not mean that we give up eating all the foods that we enjoy eating. It is rather about cooking the foods we love in a healthier way and eating more fresh vegetables, incorporating fibres into our diet and reducing the amount of processed and junk food we eat.You can enjoy a really healthy meal that is low in fat and cooked to perfection using Tefal ActiFry. All you need is one spoon of oil and the ActiFry to cook chips, curries, stews, stir fries and desserts.
The ActiFry works on a patented hot air pulse system and consists of a stirring paddle which rotates the food to assist in cooking. The fryer is easy to clean as the centre cooking pan and paddle are removable and are dishwasher safe. The ActiFry has a digital timer which is easy to set and use.


The ActiFry is versatile and you can cook simple chips, potato wedges, curries, risotto to jams and desserts. It is available in various sizes so it can be useful for a couple or for a family too. 

The ActiFry I have is the 1 kg capacity and it’s perfect for a family of four .For more details of dimensions and product details click here.
I am really enjoying cooking and experimenting in my Actifry and I will share some of my recipes here each week.


I tried this simple Apple crumble recipe in my ActiFry and it was delicious and healthy too.


print recipe

Apple and Cranberry Crumble

Delicious cinnamon spiced apples and cranberries layered with creamy custard and shredded wheat, almond and coconut crumble.

Ingredients:

For Apple filling:
  • 4 Jazz Apples
  • 60g Cranberries
  • 1 tablespoon Brown Sugar
  • 1/2 teaspoon Cinnamon
  • 1 tablespoon Lemon Juice
  • 1 teaspoon Butter
Crumble Topping:
  • 120 g Mini Shredded wheat
  • 30g Desiccated coconut
  • 60g Flaked almonds
  • 1/2 teaspoon Cinnamon
  • 1 tablespoon Brown Sugar
  • 250 ml Custard (ready made)
  • 1 tablespoon Toasted almond flakes and cranberries for garnish.
Method:

1. Core the apple and keeping the skin on cut them into 1 cm diced pieces. Add the apples to a bowl and add to it the lemon juice, cinnamon, sugar and butter and toss together. Transfer the apples to the actifry and cook them for 12 minutes.2. After 12 minutes, open the actifry and add the cranberries (but reserve a few for garnish) and cook for another 3 minutes. Remove cooked apples from the actifry and transfer to a bowl.3. Add the shredded wheat to a blender and blend it to form a rough coarse texture. Do not powder it. Add the shredded wheat to a bowl to make the crumble topping.4.To the shredded wheat add the desiccated coconut ,1 tablespoon of brown sugar and the cinnamon powder. Mix together.5.In a frying pan gently toast the almonds until golden brown, reserve a few for garnish and add the rest to the crumble mix and mix together.6.In serving glasses, spoon the apple mixture and pack it down so the glass is 1/3 full.7. On top of the apple mixture spoon the crumble mixture so that it is about 2 cm thick and pack it down.8. Spoon some warm custard over the crumble mixture and garnish the top with some cranberries and toasted almonds.The apple and cranberry crumble can be served warm or cold.
Details
Prep time: Cook time: Total time: Yield: Serves 4
I was sent the ActiFry to review by Tesco Direct, all the views and opinions in this post are my own and unbiased.

Check out this delicious pineapple raspberry crumble.
Submitting to:

Lets cook for Halloween event by simplyfood


Tuesday 7 October 2014

Brioche Pasquier Autumn Childrens Picnic


Brioche is a pastry of French origin that is akin to a highly enriched bread, and whose high egg and butter content give it a rich and tender crumb. It is "light and slightly puffy, more or less fine, according to the proportion of butter and eggs." Wikipedia
 Brioche Pasquier is a French Bakery that make a range of Brioche using traditional methods and use Levin in their dough. The techniques used to create these selection of delicious Brioche are the same as those used in 1936 when the bakery first opened. 
Their range consists of Pain au Lait with chocolate chips, Pain au Lait, Pain au Chocolat, Sliced Brioche Loaf, Croissant, Pitch chocolate, Pitch choc chip, Pitch Milk chocolate. Pitch is an individually wrapped snacking brioche filled with chocolate or strawberry. They are free from preservatives, artificial colours and hydrogenated fats. 

I was sent a sliced Brioche Loaf and a packet of the Pitch Milk chocolate rolls together with a voucher to purchase additional Ingredients to create a Picnic. I created a Brioche Pasquier Autumn Children’s Picnic which consisted of  Brioche peanut butter bunny sandwiches, Brioche cheese and cucumber triangles,Chocolate Brioche and strawberry jam pops with chocolate sprinkles,Strawberry and cream mini brioche Victoria sandwich cakes and Brioche Strawberry milkshake.


print recipe


Brioche Pasquier Peanut Butter Bunny Sandwiches

Cute bunny shaped sandwiches with organic peanut butter.

Ingredients:
  • 4 slices Brioche Bread
  • 2 tablespoons Organic smooth Peanut Butter
  • 4 raisins
Method:

1. Spread the peanut butter on the Brioche slices and sandwich them together.2. Using a bunny shaped cookie cutter, cut out two bunny shaped sandwiches from each sandwich.Place the sandwiches on a serving plate and add raisins to make eyes on the bunny sandwiches.
Details
Prep time: Cook time: 0 Total time: Yield: 4 sandwiches


print recipe

Brioche Pasquier Cheese and Cucumber Triangles

Soft Brioche triangles with vegetarian cheese and and cucumber.

Ingredients:
  • 2 slices Brioche Bread
  • 1 teaspoon Sunflower margarine
  • 2 slices Vegetarian cheddar cheese
  • 8 Cucumber Slices
Method:

1. Spread the margarine on both slices of Brioche bread and place a slice of cheese on top of each one.2. Cut each of the bread slices into 4 triangles and arrange the triangles onto a serving plate. Place a slice of cucumber onto each triangle.
Details
Prep time: Cook time:0 Total time: Yield: 8 open sandwiches


print recipe


Brioche Pasquier Chocolate and Strawberry Jam pops

Soft Brioche rolls , smothered with strawberry jam and sprinkles with chocolate strands.

Ingredients:
  • 2 Chocolate filled Brioche rolls
  • 2 tablespoons Strawberry Jam
  • 1 tablespoon Chocolate sprinkles
Method:

1. Cut each of the chocolate brioche rolls into three pieces and push a cake pop stick into each one.2. On the cut side spread some strawberry jam and dip the pop into the chocolate sprinkles.Repeat for remaining pops 3. Place them on serving plate.
Details
Prep time: Cook time:0 Total time: Yield: 6 pops


print recipe


Strawberry and Cream mini Brioche Pasquier Victorian Sandwich

Luscious strawberries and cream layered in soft sweet Brioche

Ingredients:
  • 4 slices Brioche Bread
  • 6 Strawberries
  • 2 tablespoons Strawberry Jam
  • 3 tablespoons Whipped Fresh Cream
  • 1 teaspoon Icing sugar
Method:

1. Using a round cookie cutter cut 8 round circles from the Brioche Bread.2.Slice the strawberries into rings.3.Place 4 Brioche circles on a serving plate and spread strawberry jam on them.4. Fill a piping bag with the whipped cream and pipe some cream onto the jam.4. Place 2 strawberry slices onto the cream and place the second Brioche circle on top to form a sandwich. 5. Pipe some more cream on top of the sandwich and garnish with strawberries.6. Dust with icing sugar.

Details
Prep time: Cook time: Total time: Yield: 4


print recipe


Brioche Pasquier Strawberry Milkshake

Creamy strawberry Milkshake with fresh strawberries and Brioche

Ingredients:
  • 200 ml Skimmed Milk
  • 10 Ice cubes
  • 1 slice Brioche Bread
  • 6 Chopped Strawberries
  • 1 tablespoon Honey
Method:

1. Tear the bread and add it to a blender jug, add the honey, ice cubes, strawberries and milk and blend together.2. Pour the milk shake into serving cups and garnish with strawberries.
Details
Prep time: Cook time: 0 Total time: Yield: 2 servings

Friday 3 October 2014

Quinoa and spicy Red Cabbage salad in a Jar


Quinoa pronounced as "keen-wah"  is a seed, not a grain and it’s grown high in the Andes Mountains of South America. It is a species of goosefoot (Chenopodium) .It is packed nutrients including all eight essential amino acids. It is gluten and wheat free too and has the perfect ratio of carbohydrates, proteins, and fats. Quinoa by itself tastes rather bland but it is great when flavoured with spices, herbs, nuts and vegetables.

Together with grains, seeds and nuts there are many foods such as fruits and vegetables that are good for a healthy diet and to give you healthy teeth too. Foods like salmon, purple cabbage, ginger, green tea and water are good for healthy teeth .Try and avoid alcohol, sweets, refined carbohydrates, dyes and  consume berries and beetroot in moderation as they tend to stain the teeth unless you brush your teeth immediately after eating them. Simply health are promoting "Eating for a healthy smile"  I have created this recipe using ingredients that are healthy for your teeth and I am entering this recipe  to the Simply health Healthy smile competition.

print recipe

Quinoa and Spicy Red Cabbage Salad in a Jar
Beautiful and Vibrant layered salad with aromatic flavours and textures.

Ingredients:
Layer 1
  • 1 Small white onion
  • 120g Red Cabbage finely shredded
  • 1 teaspoon Lemon juice
  • 1/4 teaspoon Salt
  • 1/4 teaspoon Chilli powder
  • 1 teaspoon Olive oil
  • 1/2 teaspoon Fresh ginger paste
Layer 2
  • 1 Medium carrot
  • 1 tablespoon Dried Cranberries
  • 1 teaspoon Lemon juice
  • 1 small pinch Salt
  • 1 small pinch Black pepper
Layer 3
  • 1/4 cup Quinoa
  • 1 cup Water
  • 1/4 teaspoon Salt
  • 1 tablespoon Fresh chopped Coriander
  • 1 pinch Turmeric
Layer 4
  • 1 Gem lettuce
  • 1/4 Pepper yellow
  • 1/4 Peppers red
Method:

Layer 1 -Spicy Cabbage 
1. Add the oil in a pan, when it is hot add the onions and sauté for 1 minute.Next add the cabbage,ginger paste salt, chilli powder and lemon juice and toss the cabbage for 5-6 minutes until it softens but is al dente.Remove from heat and cool.
Layer 2-Carrot and Cranberry Salad 
2. Grate the carrot and add it to a bowl, add the cranberries, salt, pepper and lemon juice and toss together. Keep aside
Layer 3- Quinoa and Coriander Salad 
3. Add the quinoa to apan and add the water. Add the salt and turmeric and bring to boil. Once water begins to boil, reduce the heat and cook the Quinoa for 15 minutes until all the water is absorbed and Quinoa is cooked. Transfer the cooked quinoa to a bowl and wait for it to cool. Add the chopped coriander and mix together.
Layer 4- Green Salad 
4. Shred the gem lettuce and finely slice the peppers, Mix together and keep aside.
Layering the salad. In a kilner jar with a large mouth, add a layer of the spicy cabbage, pack it down. Add a layer of the carrot and cranberry mixture and pack it down. Next add the layer of Quinoa mixture and pack it down. Finally add a layer of the green salad.
Details
Prep time: Cook time: Total time: Yield: Serves 2

Related Posts with Thumbnails